On an mobile device, you can inject media to simulate the use of a camera. This is helpful for testing application actions, such as focus or image placement, in apps that rely on camera usage, for example barcode readers or banking apps.
To learn more about media injection, including requirements, limitations, code samples, and supported APIs and Android libraries, see Media injection overview.
To activate media injection from an Appium script, perform the steps detailed in the following sections.
On this page:
1 | Prepare the media files
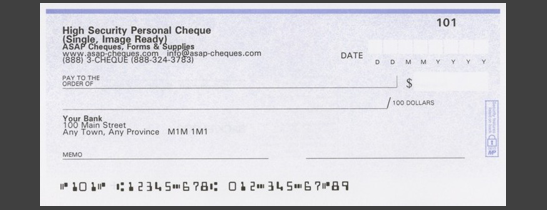
When preparing the media files, make sure to limit the media size to 1,600,000 pixels (height x width). For media to be used with check scanning apps, make sure that:
- The background color of the media is different from the color of the check.
- The width of the check takes up about 90% of the media width. If necessary, crop the media to fit accordingly.
- The height of the media is the same height as the check.
Following is a sample check media taken based on these guidelines above.
In addition, the following guidelines may be relevant on some Android devices when creating media to be used with check scanning apps:
- Keep the width of the check at 1650 pixels.
- Leave 90 pixels of black background on each side.
- Leave 150 pixels of black background from top and bottom.
- Make sure the media is sharp and focused.
- Make sure to take the picture under good light conditions.
2 | Upload the media files to the repository
When you have good quality media files, upload them to the repository via the Upload Item to Repository API.
3 | Install and configure the application
- Install the application with sensor instrumentation. This is required to enable support for media injection. For details, see the Install Application API.
In particular:- When installing the application as part of the driver creation, set the
sensorInstrumentcapability totrue. - When installing the app after the driver has been created, set the
sensorInstrumentationparameter of the Perfecto commandmobile:application:installtotrue.
- When installing the application as part of the driver creation, set the
- Configure the app to allow camera access (Settings > <application name>).
4 | Start the app
Typically, the app is started as part of the driver creation. If the tested app needs to be relaunched later, use the driver.launchApp() method. When launching a different app than the one specified in the driver capabilities, use Perfecto's Start Application extension.
5 | Start and stop media injection
To start and stop media injection with Appium testing, use the following Perfecto commands to supply the media's repository key using executeScript:
Consider the following:
- Start media injection just before entering the app page where the media needs to be used. For example, in a check scanning app, injection should take place just before pressing the button that takes the user to the check scanning screen.
- Always stop injection when leaving the page where media injection is required.
On many devices, the camera includes two main operations:
- Preview: The camera screen initializes a preview display and a preview callback (
setPreviewDisplay,setPreviewCallback). The preview display is responsible for showing the camera on the screen and the preview callback sends camera frames to the application. - Take picture: When you click the designated Take Picture button in the app, the app can take a picture in one of the following ways:
- By using the
takePictureAPI that is designed specifically for taking pictures - By taking the last frame from the preview callback
- By using the
As the tester, you should be familiar with the flow of the camera operation of the tested application and be prepared to inject the media at the proper junction of the test to cover not only the preview but also the take picture operation and any refresh operation that may be used in the flow.