Learn how to use JMeter and its JUnit Sampler to run RemoteWebDriver scripts against cloud devices. You can order JUnit tests and use them inside a JMeter test plan to create test flows. JMeter also records test execution times and can run devices repeatedly and in parallel. A sample project is available on GitHub here.
On this page:
Prerequisites
Make sure you have the following installed:
- Java IDE, such as Intellij IDEA or Eclipse, to develop and compile tests
- JMeter client
Step-by-step instructions
Click a step to view details.
-
Create JUnit tests. Make sure to keep each test as a small unit of work, such as verifying that a new page is loaded after a button is clicked. This allows JMeter to record the elapsed time for just that action.
Copy@Test
public void testClickBackToLogin() {
driver.get().findElement(By.xpath("//*[text()='Back']")).click();
Assert.assertNotNull(driver.get().findElement(By.name("username")));
} -
Compile and build a
.jarfile with all dependencies using Maven or Gradle. The image shows the IntelliJ configuration for building the full.jarfile.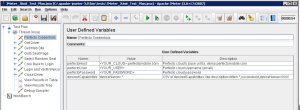
- Place this .jar file (built in step 2 above) in the
apache-jmeter-3.0\lib\junitdirectory: junit-jmeter-test-bare-all-1.0.jar - Start JMeter and open the following JMeter project: JMeter_JUnit_Test_Plan.jmx
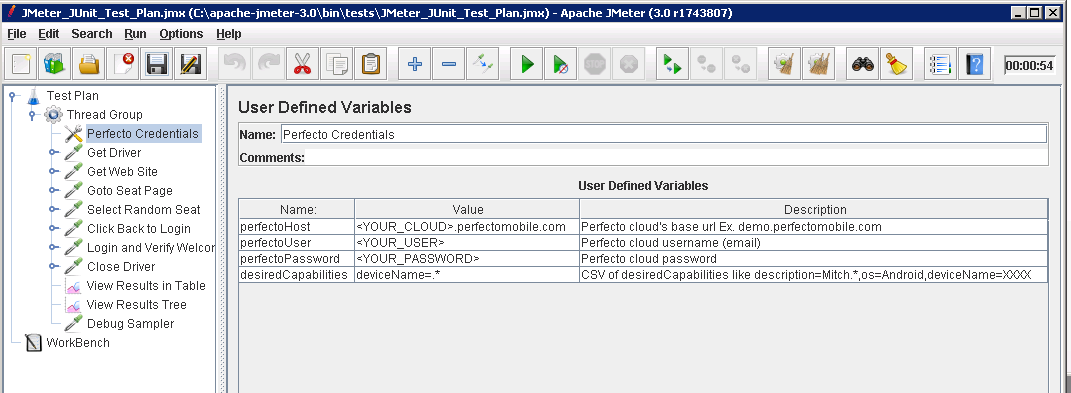
- In Test Plan, under Thread Group, click Perfecto Credentials.
- Set the User Defined Variables. You can also set
scriptNamein thedesiredCapabilitiesvariable. Otherwise, it defaults toHackathonDemoTest. - Click the green play button to execute the script.
- In the table/tree, open View Results to the see timer results.
- Experiment with the number of threads and/or executions in the Thread Group module. Devices will run in parallel and repeatedly execute the tests.
JMeter Sampler tutorial
Perform the JMeter Sampler tutorial to get an understanding of all its configuration and features. The tutorial attempts to explain the basic design, functionality and usage of the new JUnit Sampler for JMeter. The sampler was introduced in 2.1.2 release of JMeter. Earlier releases do not have the sampler.
Design
The current implementation supports standard JUnit convention and extensions, like oneTimeSetUp and oneTimeTearDown. Other features can be added on request. The sampler works like the JavaSampler with some differences.
-
Rather than use JMeter's test interface, it scans the jar files for classes extending junit's TestCase class. This means any class or subclass.
-
JUnit test jar files are copied to jmeter/lib/junit instead of jmeter/lib
-
JUnit Sampler does not use name/value pairs for configuration. The sampler assumes setUp and tearDown will configure the test correctly.
Important: setUp and tearDown methods must be declared public so that JMeter can use it. -
The sampler measures the elapsed time only for the test method and does not include setUp and tearDown.
-
Each time the test method is called, JMeter will pass the result to the listeners.
-
Support for oneTimeSetUp and oneTimeTearDown is done as a method. Because JMeter is multi-threaded, we cannot call oneTimeSetUp/oneTimeTearDown the same way maven does it.
-
The sampler reports unexpected exceptions as errors.
Functionality
Following is a description of the functionalty.
-
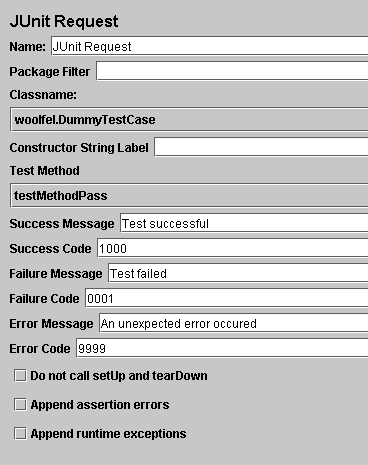
Name – name for the sample. This is the same as all JMeter samplers.
-
Package Filter – provides a way to filter the classes by package name.
-
Classname – the name of the class to test. The sampler will scan the jar files in jmeter/lib/ext and jmeter/lib/junit for classes extending junit's TestCase.
-
Constructor String – a string to pass to the string constructor of the test class.
-
Test Method – the name of the method to test in the sampler.
-
Success message – a descriptive message indicating what success means.
-
Success code – an unique code indicating the test was successful.
-
Failure message – a descriptive message indicating what failure means.
-
Failure code – an unique code indicating the test failed
-
Error message – a description for errors
-
Error code – some code for errors. Does not need to be unique
-
Do not call setUp and tearDown – set the sampler not to call setUp and tearDown. By default, setUp and tearDown should be called. Not calling those methods could affect the test and make it inaccurate. This option should be used with caution. If the selected method is oneTimeSetUp or oneTimeTearDown, this option should be checked.
-
Append assertion error – By default, the sampler will not append the assert failures to the failure message. To see the message in the result tree, check the option.
-
Append runtime exception – By default, the sampler will not append the exceptions to the failure message. To see the stacktrace, check the option
The current implementation of the sampler will try to create an instance using the string constructor first. If the test class does not declare a string constructor, the sampler will look for an empty constructor.
By default, JMeter will provide some default values for the success/failure code and message. Users should define a set of unique success and failure codes and use them uniformly across all tests.
Usage
Following is a short step-by-step procedure.
-
Write your JUnit test and jar the classes.
-
Copy and paste the jar files into the jmeter/lib/junit directory.
-
Start JMeter and select Test plan.
-
Right-click Add and select Thread group.
-
Right click Add and select Sampler > JUnit request.
-
Enter my unit test as the name and the package of your JUnit test.
-
Select the class and method you want to test.
-
Enter test successful as the success message and 1000 as the success code.
-
Enter test failed as the failure message 0001 as the failure code.
-
Select the thread group, right-click Add and select Listener > View results tree.
One benefit of the JUnit Sampler is that it allows you to select any method from a variety of unit tests to create a test plan. This should reduce the amount of code a user needs to write to create a variety of test scenarios. From a basic set of test methods, different sequences and tests can be created using JMeter's GUI.
For example:
Test Plan1
-
TestCase1.testImportCustomer
-
TestCase2.testUpdateRandomCustomer
-
TestCase1.testSelect100
-
TestCase2.testUpdateOrder
-
TestCase1.testSelect1000
Test Plan 2
-
TestCase1.testImportCustomer
-
TestCase1.testSelect100
-
TestCase1.testSelect1000
-
TestCase2.testAdd100Customers
General guidelines
Following are some general guidelines for writing JUnit tests so they work well with JMeter. Because JMeter runs multi-threaded, it is important to keep certain things in mind.
-
Write the setUp and tearDown methods so they are thread safe. This generally means avoid using static memebers.
-
Make the test methods discrete units of work and not long sequences of actions. By keeping the test method to a descrete operation, it makes it easier to combine test methods to create new test plans.
-
Avoid making test methods depend on each other. Since JMeter allows arbitrary sequencing of test methods, the runtime behavior is different than the default JUnit behavior.
-
If a test method is configurable, be careful about where the properties are stored. Reading the properties from the Jar file is recommended.
-
Each sampler creates an instance of the test class, so write your test so the setup happens in oneTimeSetUp and oneTimeTearDown.
-
If you select a class and no methods show up, it means the sampler had a problem creating an instance of the test class. The best way to debug this is to add some System.out to your class constructor and see what is happening.


