Federated single sign-on (SSO) enables users to access many applications or services using a single set of credentials, managed by their organizations Identiy Provider (IdP). This simplifies login workflows and enhances security in corporate environments.
In a federated SSO setup, the IdP controls both authentication (verifying user identity) and authorization (assigning roles and group memberships). Perfecto respects this federated authority by mapping user attributes, such a roles, device groups, and org group, based on values provided by the IdP.
Perfecto supports integration with any IdP that implements the Security Assertion Markup Language (SAML) 2.0 protocol, including commonly used providers such as ADFS 2.0/3.0, PingFederate/PingOne, Okta, CA, and Azure-based Active Directory.
To implement SSO authentication, you need to work with Perfecto Support.
On this page:
Limitations
The following limitations apply:
-
Federated SSO isn't supported in the public cloud or with subscription plans.
-
Federated SSO with Perfecto is an authentication method, not an integration. It doesn't sync the individual accounts in a user store to the Perfecto Lab.
-
Perfecto supports role-based access control (RBAC) with IdPs, but Perfecto's federated SSO provider can't handle a scenario where the validation fails because the user doesn't have the required authorization role assigned and access is denied. In this case, instead of displaying the proper error message, the browser starts redirecting to the IdP login page continuously. If this happens, contact your IdP or your IT department for proper access.
-
Safari browser users may face login issues. To avoid this, under Safari > Settings, on the Privacy tab, clear the Prevent cross-site tracking checkbox.
-
If you update user roles, device groups, or the org group through the Perfectodesktop app (deprecated Flash-based UI) or legacy API endpoints, the user configuration does not update.
IdP requirements
The IdP you select must support the following:
-
SP-initiated SSO
-
SAML 2.0
Username format for external IdP users
For users authenticated through an external identity provider (IdP), Perfecto uses the username value provided in the SAML assertion. Using an email address as the username is recommended but not enforced. External IdP tenants can continue to use non‑email usernames, provided the IdP is configured accordingly.
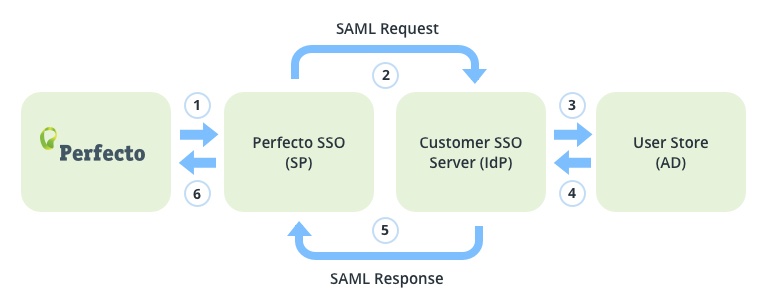
Federated SSO flow with Perfecto
The following diagram gives a high-level overview of Perfecto's federated SSO sign-in flow.
-
A user accesses the Perfecto cloud, such as https://mycloud.perfectomobile.com/.
-
Perfecto forwards the request to the IdP, and the IdP redirects the user to its login page.
-
The user logs in with the company credentials.
-
The IdP validates the user against the user store.
-
The IdP sends the SAML assertion back to Perfecto. At a minimum, the SAML assertion response from the IdP must contain the desired username for the Perfecto cloud (if it isn't the user's email, the cloud should be configured accordingly). The response may also include more attributes such as email address, given name, last name, user roles, device groups, and org group. These attributes are used to assign permissions and access with the Perfecto cloud.
- The user is authenticated and logged into the Perfecto Lab session.
Federated SSO setup steps
Setting up federated SSO with Perfecto is a process that involves close cooperation between your company and Perfecto Support. It consists of the following steps:
- Discover: After finalizing IdP selection, Perfecto and the IdP need to replace SAML 2.0 metadata. See What Perfecto needs from your IdP below for instructions on how to obtain your IdP metadata. When you get the metadata, make sure 26.2 Beta 3 was validated against the SAML 2.0 XSD (for example, you can use this login validation tool: https://www.samltool.com/validate_xml.php).
-
Initial setup: Open a ticket with Perfecto Support that includes your IdP metadata. A member of the Perfecto Support team then sets up the connection from Perfecto (the service provider) to your IdP.
Similarly, on your end, you need to set up the connection from your IdP to Perfecto using the Perfecto metadata file. See What you need from Perfecto to set up your connection below for details.
-
Test: Verify the federated SSO connection between the Perfecto cloud and your IdP with one or two users. After accessing the Perfecto URL, the system should redirect these users to your IdP login page, where they enter their IdP user credentials. When the IdP provider accepts their credentials, they should be logged in to the Perfecto cloud.
This step takes 30-60 minutes. During this time, affected users can't log in to the Perfecto cloud.
-
Production setup: During this step, Perfecto enables the IdP configuration and migrates all users. The migration path depends on the type of usernames you use.
This step takes 30-60 minutes. During this time, affected users can't log in to the Perfecto cloud.
If your organization uses federated SSO with role and group mapping, ensure that the relevant SAML attributes are correctly configured in your IdP. Perfecto will automatically map these attributes into the user configuration during login.- Email usernames: Both your IdP and the Perfecto cloud use email usernames. In this case, Perfecto automatically migrates all cloud users to the new configuration during this session. For automated testing, either skip predefined automation users or replace their security token after the session.
-
ID usernames: Your IdP uses ID usernames and your Perfecto cloud uses email usernames. In this case, Perfecto renames the email to an ID. You need to set up a comma-separated mapping file that correlates a user's email address in the Perfecto system with the user ID in the IdP system. For example:
Copyjohod@test.com,jdoe
johod1@test.com,jdoe1
johod2@test.com,jdoe2For more details about creating new users, see New users.
Metadata exchange and configuration notes
To complete the initial setup of federated SSO with Perfecto, your organization and Perfecto Support must exchange SAML 2.0 metadata files. This exchange ensures that both parties can establish a trusted connection between your Identity Provider (IdP) and the Perfecto cloud.
If you are unable to generate an IdP metadata file automatically, you can manually create one using the following required fields:
-
Single sign-on URL/Endpoint URL:
https://auth<your-tenant>.perfectomobile.com/auth/realms/<cloud-name>-perfectomobile-com/broker/<cloud-name>-idp/endpoint -
Entity ID/Vendor ID:
https://auth<your-tenant>.perfectomobile.com/auth/realms/<cloud-name>-perfectomobile-com
Where:
-
<cloud-name>is the name of your Perfecto cloud instance. -
<your-tenant>is your tenant's federated SSO number, which you can find by accessing your cloud URL.
Before submitting your metadata to Perfecto Support, validate it against the SAML 2.0 XSD. You can use tools such as https://www.samltool.com/validate_xml.php for this purpose.
Once Perfecto receives your validated IdP metadata, they will provide the corresponding Perfecto metadata file in XML format. This file includes your installation license and must be used to configure the connection on your IdP side.
You must complete the metadata exchange as a prerequisite for enabling SSO, and do so before testing or migrating users to production.
What you need from Perfecto to set up your connection
You need to obtain the Perfecto metadata file for your installation. Contact Perfecto federated SSO support personnel to supply the file. The file is in XML format and includes your installation license.
The metadata file provided by Perfecto includes support for mapping user roles, device groups, and org groups via SAML assertions. Ensure that your IdP configuration uses the expected attribute names for roles, device groups, and org group. To learn more, see SAML attribute mapping for roles and groups.
Sample Perfecto Metadata file
<EntityDescriptor xmlns="urn:oasis:names:tc:SAML:2.0:metadata" entityID="https://https://auth<x>.perfectomobile.com/auth/realms/<cloud-name>-perfectomobile-com">
    <SPSSODescriptor AuthnRequestsSigned="true"
            protocolSupportEnumeration="urn:oasis:names:tc:SAML:2.0:protocol urn:oasis:names:tc:SAML:1.1:protocol http://schemas.xmlsoap.org/ws/2003/07/secext">
        <KeyDescriptor use="signing">
            <dsig:KeyInfo xmlns:dsig="http://www.w3.org/2000/09/xmldsig#">
                <dsig:X509Data>
                    <dsig:X509Certificate>
eyJhbGciOiJSUzI1NiJ9.eyJqdGkiOiIxMjdmMWVlZS0zYzIwLTRkYjAtYTE2NC00M2ZkMjMzZWM4M2IiLCJleHAiOjAsIm5iZiI6MCwiaWF0IjoxNDk5MDc5OTUxLCJpc3MiOiJodHRwczovL2F1dGguYXdzLXN0Zy5wZXJmZWN0b21vYmlsZS5jb20vYXV0aC9yZWFsbXMvbWNtLXNzby1wZXJmZWN0b21vYmlsZS1jb20iLCJhdWQiOiJvZmZsaW5lLXRva2VuLWdlbmVyYXRvciIsInN1YiI6IjhhNjk4YmJjLWY3MWItNDk2YS04MWM1LTFhNWMzMTlmZjU2NiIsInR5cCI6Ik9mZmxpbmUiLCJhenAiOiJvZmZsaW5lLXRva2VuLWdlbmVyYXRvciIsInNlc3Npb25fc3RhdGUiOiI2OGU3MTEzYy1hNjQyLTQ3NDQtODE3MC05ZTQ3YzczMDE2YzciLCJjbGllbnRfc2Vzc2lvbiI6IjI2ZDg3M2MwLWZhZGItNGFkNS04MTUyLWVlMzg0NWRlYzc3NiIsInJlYWxtX2FjY2VzcyI6eyJyb2xlcyI6WyJvZmZsaW5lX2FjY2VzcyJdfSwicmVzb3VyY2VfYWNjZXNzIjp7ImFjY291bnQiOnsicm9sZXMiOlsibWFuYWdlLWFjY291bnQiLCJ2aWV3LXByb2ZpbGUiXX19fQ.oZjhXTA9dFq1WF-gKEjyX4cTRuUVBcT6dPGAU0Wrx2ltX1-siRm4gbUIp5O9jatBflYIogCcga3xgo0C57MxprTmnw9-ZFzgBlLu6qUZyDyQTs3KJYjAsEd36cP6I9EfbQhlUde_RNMgBOt1W0yaw5wQmKNhT93-BOqYAZ7MaEdO_SUf80PO6cO1mPwsLGhzIBLJp73Vw-VDquXOKrIb4HP1g4Rm1xAaBKC2fGSpmKQGkX3zL6meAniDxQbb1JdvcVwxoJDXb_s2GFOzV7C8v8qG6KKtUahZL5FFucHbKov3F_jKA_xazT3PnSvLZ-EQTPhYrDBWbNG7flD-BwDJPA
                    </dsig:X509Certificate>
                </dsig:X509Data>
            </dsig:KeyInfo>
        </KeyDescriptor>
        <SingleLogoutService Binding="urn:oasis:names:tc:SAML:2.0:bindings:HTTP-POST" Location="https://auth<x>.perfectomobile.com/auth/realms/<cloud-name>-perfectomobile-com/broker/mycloud-ca/endpoint"/>
        <NameIDFormat>urn:oasis:names:tc:SAML:2.0:nameid-format:persistent </NameIDFormat>
        <AssertionConsumerService
                Binding="urn:oasis:names:tc:SAML:2.0:bindings:HTTP-POST" Location="https://auth<x>.perfectomobile.com/auth/realms/<cloud-name>-perfectomobile-com/broker/mycloud-ca/endpoint"
                index="1" isDefault="true" />
    </SPSSODescriptor>
</EntityDescriptor>
What Perfecto needs from your IdP
You need to supply the IdP metadata file to Perfecto. In addition, Perfecto requires that you configure:
-
NameID Policy Format to
unspecified(optional but recommended) -
Audience Restriction/Audience URI to
emptyor to our entity ID, which ishttps://auth<x>.perfectomobile.com/auth/realms/<cloud-name>-perfectomobile-comwhere:
-
<cloud-name>is the name of your cloud -
<x>is your tenant's federated SSO number. To find your tenant's federated SSO number, access your cloud in a browser and extract it from the URL.
-
-
The following SAML user attributes:
-
NameID -
email -
firstName -
lastName -
Destination -
urn:perforce:perfecto:authz:roles -
urn:perforce:perfecto:authz:resources -
groups
-
The following XML snippet shows a sample SAML response that includes all required attributes for user identification and authorization.
Complete SAML response example
<samlp:Response xmlns:samlp="urn:oasis:names:tc:SAML:2.0:protocol"
  ID="_97c7a054-a5e5-4761-92e8-829d9b8fc995"
  Version="2.0"
  IssueInstant="2021-03-08T11:19:02.139Z"
  Destination="https://auth<your-tenant>.perfectomobile.com/auth/realms/<cloud-name>-perfectomobile-com/broker/<cloud-name>-idp/endpoint"
  InResponseTo="ID_add6bd08-724a-4ac8-b931-e324eecd2acc">

  <saml2:Assertion xmlns:saml2="urn:oasis:names:tc:SAML:2.0:assertion">
    <saml2:Subject>
      <saml2:NameID Format="urn:oasis:names:tc:SAML:1.1:nameid-format:unspecified">john.doe@mycloud.com</saml2:NameID>
    </saml2:Subject>
    <saml2:AttributeStatement>
      <saml2:Attribute Name="email" NameFormat="urn:oasis:names:tc:SAML:2.0:attrname-format:unspecified">
        <saml2:AttributeValue xsi:type="xs:string">john.doe@mycloud.com</saml2:AttributeValue>
      </saml2:Attribute>
      <saml2:Attribute Name="firstName" NameFormat="urn:oasis:names:tc:SAML:2.0:attrname-format:unspecified">
        <saml2:AttributeValue xsi:type="xs:string">John</saml2:AttributeValue>
      </saml2:Attribute>
      <saml2:Attribute Name="lastName" NameFormat="urn:oasis:names:tc:SAML:2.0:attrname-format:unspecified">
        <saml2:AttributeValue xsi:type="xs:string">Doe</saml2:AttributeValue>
      </saml2:Attribute>
      <saml2:Attribute Name="urn:perforce:perfecto:authz:roles" NameFormat="urn:oasis:names:tc:SAML:2.0:attrname-format:unspecified">
        <saml2:AttributeValue>perfecto:role=report_admin</saml2:AttributeValue>
        <saml2:AttributeValue>perfecto:role=administrator</saml2:AttributeValue>
      </saml2:Attribute>
      <saml2:Attribute Name="urn:perforce:perfecto:authz:resources" NameFormat="urn:oasis:names:tc:SAML:2.0:attrname-format:unspecified">
        <saml2:AttributeValue>INTERNALVCPRIVATEUSAGE</saml2:AttributeValue>
        <saml2:AttributeValue>INTERNALVCPUBLIC_USAGE</saml2:AttributeValue>
      </saml2:Attribute>
      <saml2:Attribute Name="groups" NameFormat="urn:oasis:names:tc:SAML:2.0:attrname-format:unspecified">
        <saml2:AttributeValue>USER_ORG_GROUP</saml2:AttributeValue>
      </saml2:Attribute>
    </saml2:AttributeStatement>
  </saml2:Assertion>
</samlp:Response>
You also need to assign your IdP users to the Perfecto application within your IdP.
Consider contacting your IdP to:
- Extract the SAML 2.0 metadata file
- Assign users (also for optimal IdP configuration and setup).
Following are high-level instructions some common IdPs. These instructions serve as a reference only. Make sure to verify them with your specific IdP.
-
Register a new OKTA app:
Click the profile name > your org > Admin > Applications > add application > create new app > SAML 2 > enter a name, and click Next.
-
For Single sign-on URL, enter the following:
https://auth
<x>.perfectomobile.com/auth/realms/<cloudname>.perfectomobile.com/broker/<cloud-name>-okta/endpointwhere:
-
<cloud-name>is the name of your Perfecto cloud instance. -
<x> is your tenant's SSO number. To find your tenant's SSO number, access your cloud in a browser and extract it from the URL.
For Audience URI (SP Entity ID), enter the IDP name.
-
-
Click Next. Then select I'm an
Okta
customer adding an internal app.
- Click the Identity Provider metadata link to download the IDP metadata.
- Save the downloaded metadata file and supply it to Perfecto Support personnel.
- To integrate users with Perfecto applications, go to the created application (Admin > Applications > Perfecto application) and click Assign. The user is attached to the Perfecto application.
- Go to Apps > add an app > can't find your app link.
- In the wizard that opens, do the following:
- in the Basic info field, enter a display name, for example Perfecto.
- Click Download IDP metadata. Then click Continue.
- Use the Perfecto metadata file and upload it to the current wizard step.
- Finish the wizard with defaults.
- To have users integrated with Perfecto applications, CA has to have at least one department. If you do not have a department, create one:
- Click Admin > Organization.
- Select Departments.
- Enter a name and click Add.
- Click Rules.
- Add the department of the user as a rule to assign the application to the user.
- Go to the Azure classic portal, select the Active Directory sub menu, and select the active directory you want to use for SSO.
- In the top navigation bar, go to Applications.
- At the bottom of the screen, click Add.
- Select Add an application from the gallery.
- Select Custom > Add an unlisted application my organization is using and enter Perfecto as the application name. Click the check button when done.
- Select Configure single sign-on > Microsoft Azure AD Single Sign-On.
-
Place the identifier and Reply URL information that the Perfecto SSO team provided for you in the corresponding fields, as follows:
Identifier:
https://auth<x>.perfectomobile.com/auth/realms/<cloud-name>-perfectomobile-comReply URL:
https://auth<x>.perfectomobile.com/auth/realms/<cloud-name>-perfectomobile-com/broker/<cloud-name>-idp/endpointwhere:
-
cloud-nameis the name of your Perfecto cloud instance. -
<
x>is your tenant's SSO number. To find your tenant's SSO number, access your cloud in a browser and extract it from the URL.
-
-
On the Download Metadata (XML) page, select the option to confirm that you have configured SSO and click Next.
- Enter the email address to use for notifications about maintenance issues.
- When you are back on the applications main page, navigate to Attributes.
- Under SAML Token Attributes, hover over the line where TYPE is user attribute (nameid) (usually the first one) and click the pencil icon to edit.
- Change the attribute value to user.mail and click the check button.
- At the bottom of the screen, click Apply Changes.
- Add users to the Perfecto application in Azure.
For other or custom IdPs, contact your IdP directory to assist with obtaining the metadata file.
New users
When a new user gets added to the IdP system and passes identification, Perfecto automatically adds the user if it doesn't exist. For details, see Just-in-time (JIT) user provisioning. If you want to control a user's access to the Perfecto cloud, you can do this through the IdP authorization (by assigning the user to your Perfecto application within your IdP). You can also turn off JIT entirely by sending a request to Perfecto Support.
By default, all new users get created without assigned roles and device tokens unless these are provided via SAML attributes. You can opt to configure roles and tokens globally if required. If you want to change role and token assignments for individual users, your admin can do this manually.
SAML attribute mapping for roles and groups
Perfecto supports mapping of user roles, device groups, and org group from SAML responses. These attributes are extracted from the SAML assertion and stored in the user configuration during login.
To learn more user roles, device groups, and org groups, see User management and Device management.
Supported attributes and naming conventions
| Attribute type | SAML attribute name | Example or allowed values |
|---|---|---|
|
Roles |
|
Allowed values only:
|
|
Device groups |
|
Example values:
|
|
Org group |
|
Example value:
|
Behavior and limitations
-
Roles and groups are updated during the login flow only if changes are detected.
-
If a device group or org group specified in the SAML response doesn't exist in Perfecto, the group isn't added and group/attribute synchronization fails. JIT user creation is not affected. To avoid this, ensure all referenced groups exist in Perfecto.
-
Updates made via the Perfecto desktop app (deprecated Flash-based UI) or legacy API endpoints do not affect the user configuration and may lead to inconsistencies.
-
For customers using external IdPs, only the IdP should handle user management (including roles and group assignments). Admins should not manually change these settings in Perfecto to avoid conflicts. If a user is reassigned within Perfecto, the next login will override the changes based on the SAML assertion.
-
User configurations include the latest roles, device groups, and org group from the most recent login.
SAML response example
<saml2:Attribute Name="urn:perforce:perfecto:authz:resources" NameFormat="urn:oasis:names:tc:SAML:2.0:attrname-format:unspecified">
  <saml2:AttributeValue>perfecto:role=report_admin</saml2:AttributeValue>
  <saml2:AttributeValue>perfecto:role=administrator</saml2:AttributeValue>
</saml2:Attribute>

<saml2:Attribute Name="urn:perforce:perfecto:authz:resources" NameFormat="urn:oasis:names:tc:SAML:2.0:attrname-format:unspecified">
  <saml2:AttributeValue>INTERNALVCPRIVATEUSAGE</saml2:AttributeValue>
  <saml2:AttributeValue>INTERNALVCPUBLIC_USAGE</saml2:AttributeValue>
</saml2:Attribute>

<saml2:Attribute Name="groups" NameFormat="urn:oasis:names:tc:SAML:2.0:attrname-format:unspecified">
  <saml2:AttributeValue>USER_ORG_GROUP</saml2:AttributeValue>
</saml2:Attribute>