Automation at scale that implements responsive web design or parallel execution requires advanced tools for fast triaging. The need is increasingly growing as these testing methodologies involve execution across multiple digital platforms, in different screen orientations, and under different environment conditions. Visual validation and comparison of test execution results is a natural solution for an effective triaging process and to easily highlight the areas of risk.
With the Cross Report View functionality, you can make sure that the new code tested is rendering properly across all digital platforms.
- Tests with report artifacts that are older than the test retention period
- Tests that use more than one platform
Watch this short video to see how you can work with and navigate cross reports.
On this page:
Compare test results visually
You can compare test results visually with the cross report display by showing reports side by side.
Smart Reporting automatically defines groups of tests that have run in the last 7 days and have the same defined characteristics (including job, project, branch information) but may differ in the capabilities, especially device selection capabilities. Each such group is called a test set. Members of a test set that share the same set of capabilities are represented by the latest test run.
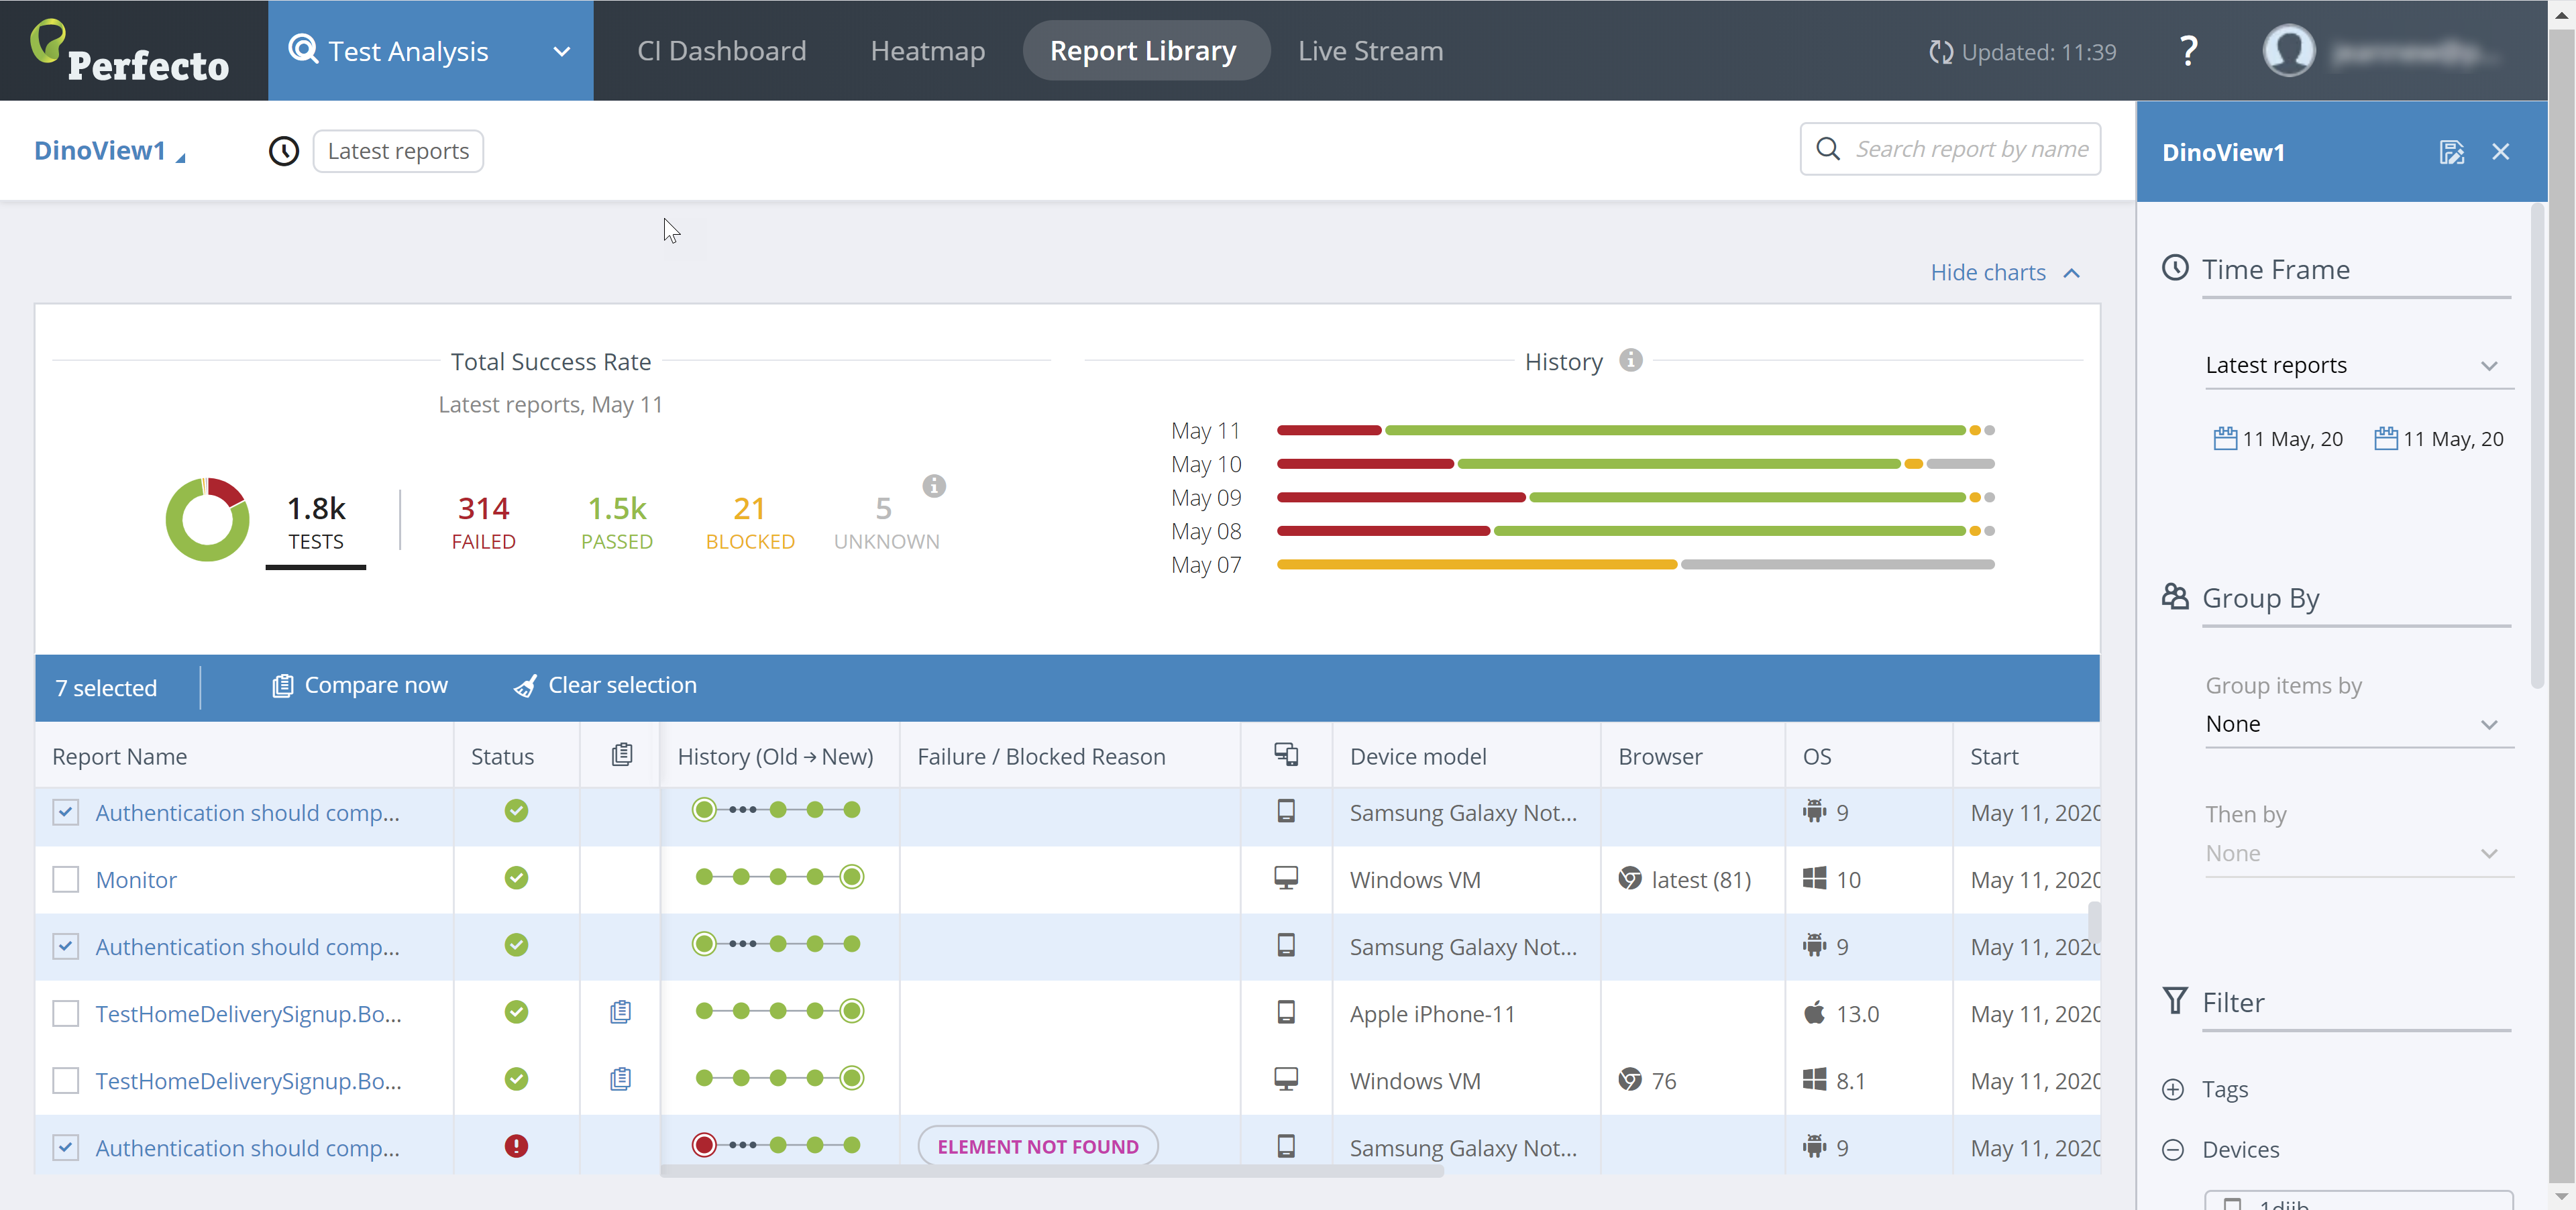
When Smart Reporting includes a test run in a test set, the Perfecto Report indicator column includes the cross report icon ![]() for all tests in the test set. Clicking the icon displays the cross report for the test-set (see below).
for all tests in the test set. Clicking the icon displays the cross report for the test-set (see below).
To select tests for a custom cross report:
-
In the Test Analysis view, on the Report Library tab, select the check box to the left of each test you want to include in the cross report.
Alternatively, you can click the cross report icon
 to the right of a report name to compare reports of multiple devices.
When you select the first check box, a new header line appears. It includes the following information:
-
The number of test items selected
-
A Compare now button to display the custom cross report
-
A button to clear the selected check boxes
-
- To display the custom cross report, click Compare now.
Understand the Cross Report view
You can create test-specific cross reports and custom cross reports. Custom cross-reports can have common steps or no common steps.
Custom cross report with common steps
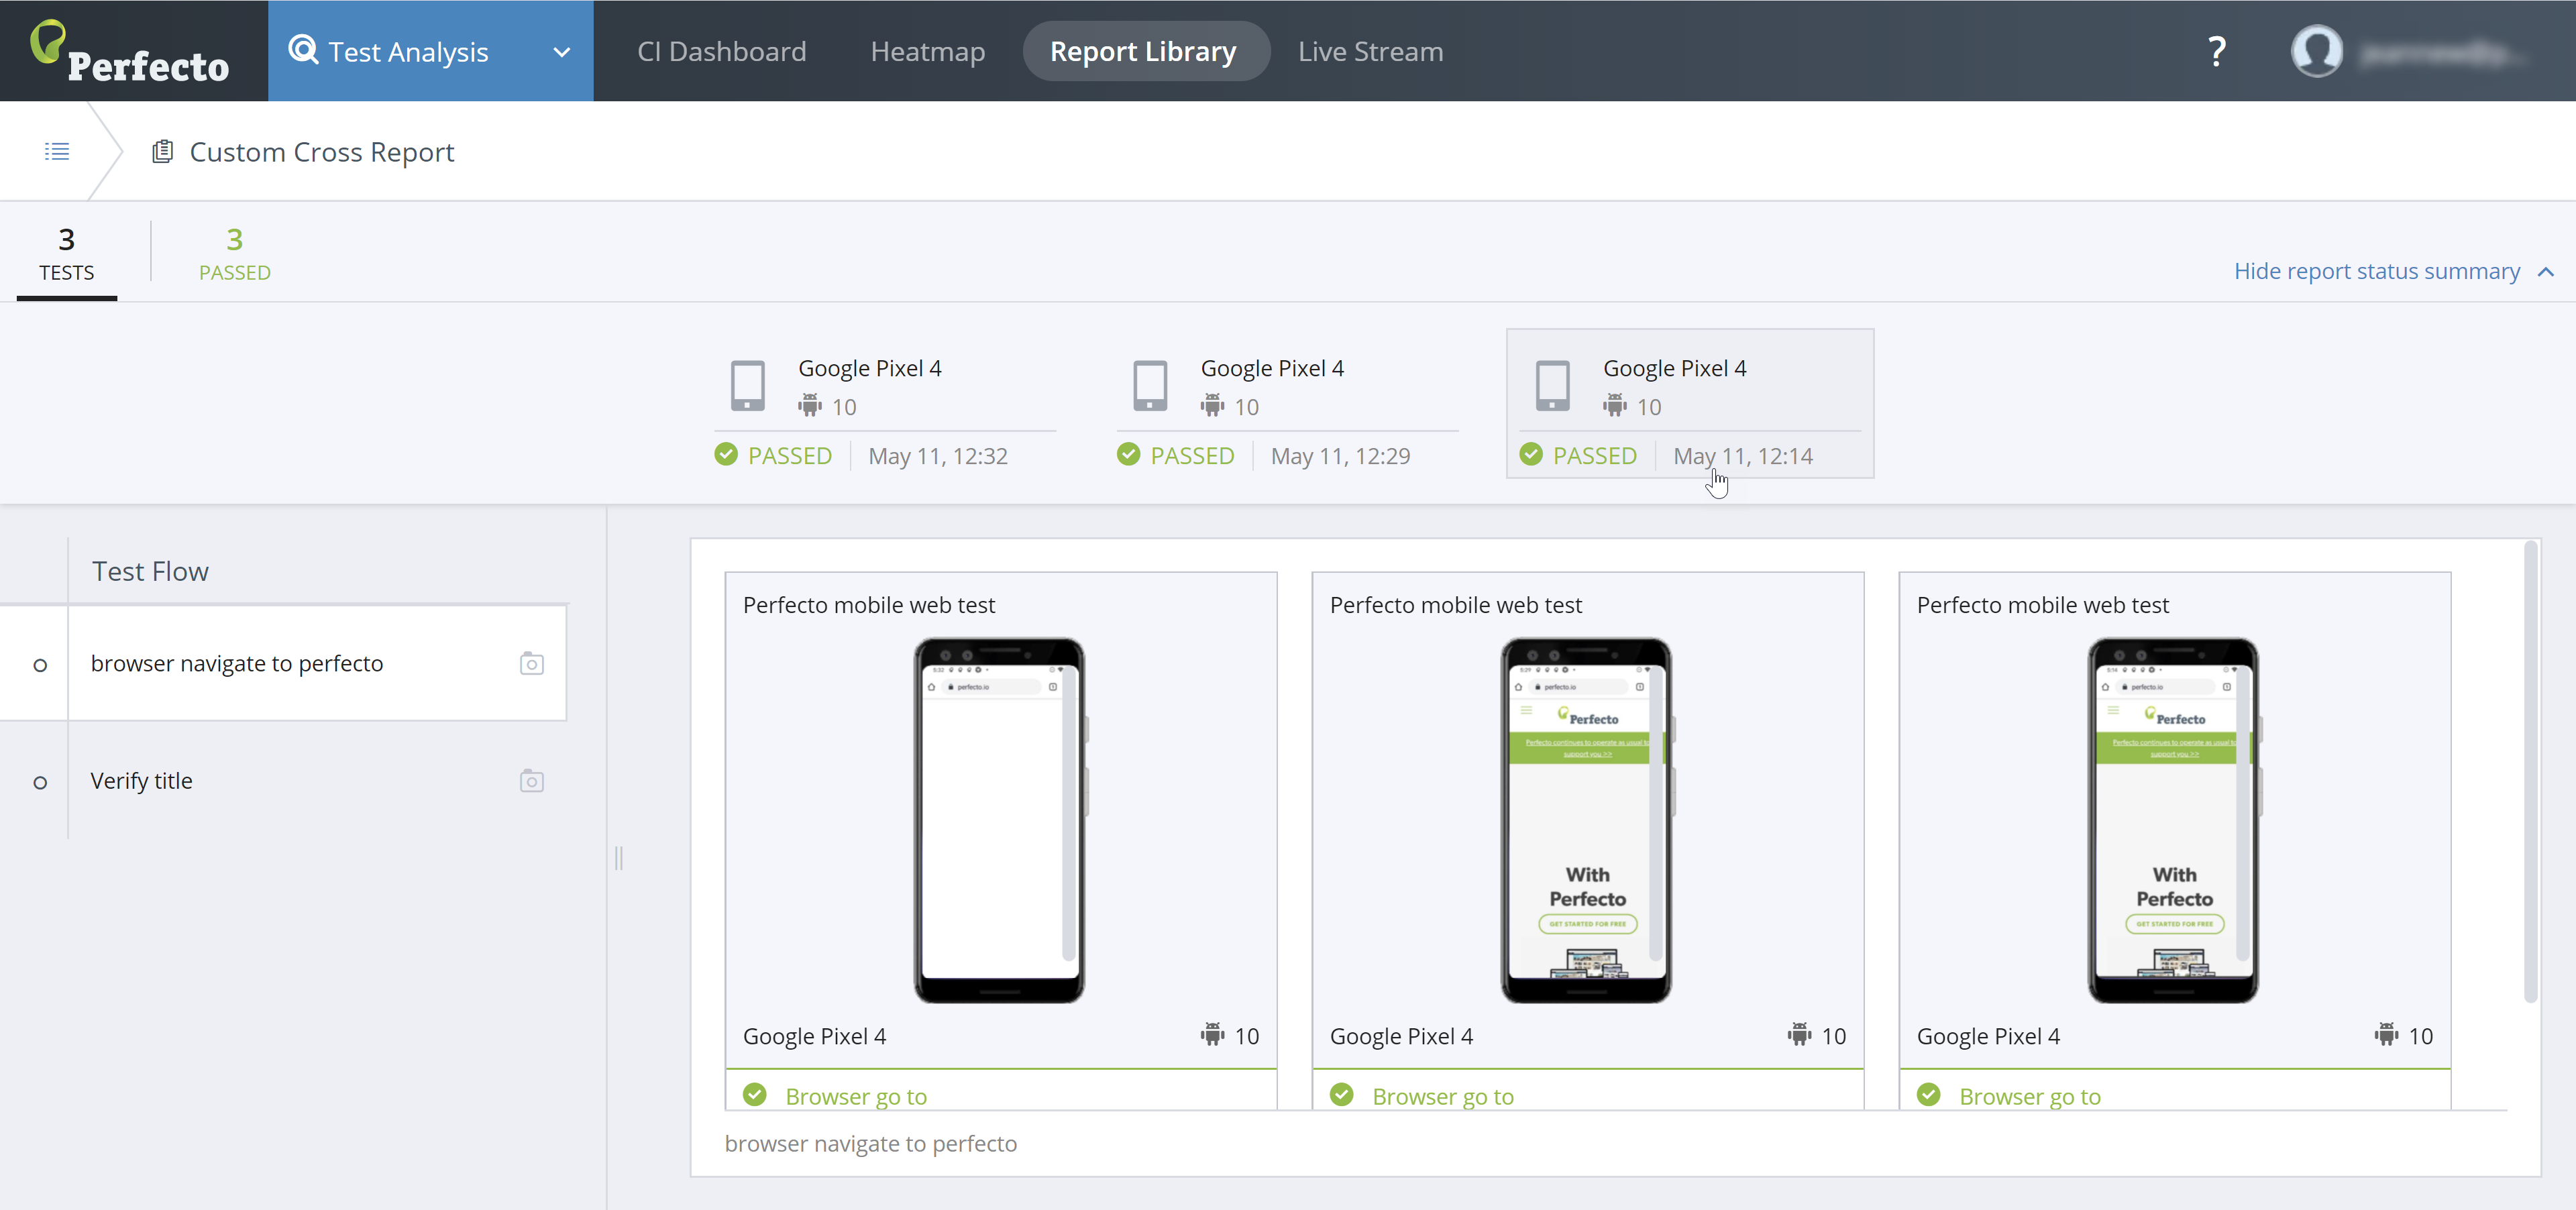
Smart Reporting analyzes the test reports selected for the cross report view and identifies the set of steps used for the tests. When common steps are identified, the Cross Report view displays:
- A top header line with a statistical summary of the tests selected for the cross report
- A second header line showing a short summary of each test selected, in clickable widgets, that includes:
- Device type and OS used for the test
- Final test status
- Date test run
- Left panel: Common steps across the different test reports
- Right panel: A set of screenshots from each of the selected test reports. Each screenshot corresponds to the state of the device/test for the step selected in the left panel.
Usage notes:
- Clicking a Statistical Overview field (in top header line) filters the displayed tests to focus on all tests with the selected final status (Passed, Failed, or Unknown).
- The screenshot panels only display if you select a step. When you open a cross report, no step is selected.
- The Report Status Summary widgets and the screenshot panels are coordinated. Moving the pointer over any of them highlights the corresponding pair.
- Clicking a summary widget or a screenshot opens the single test report selected.
- If a test did not execute one of the steps, the screenshot panel for the step does not display a screenshot. Instead, a message notifies you that the step was not executed.
Custom cross report without common steps
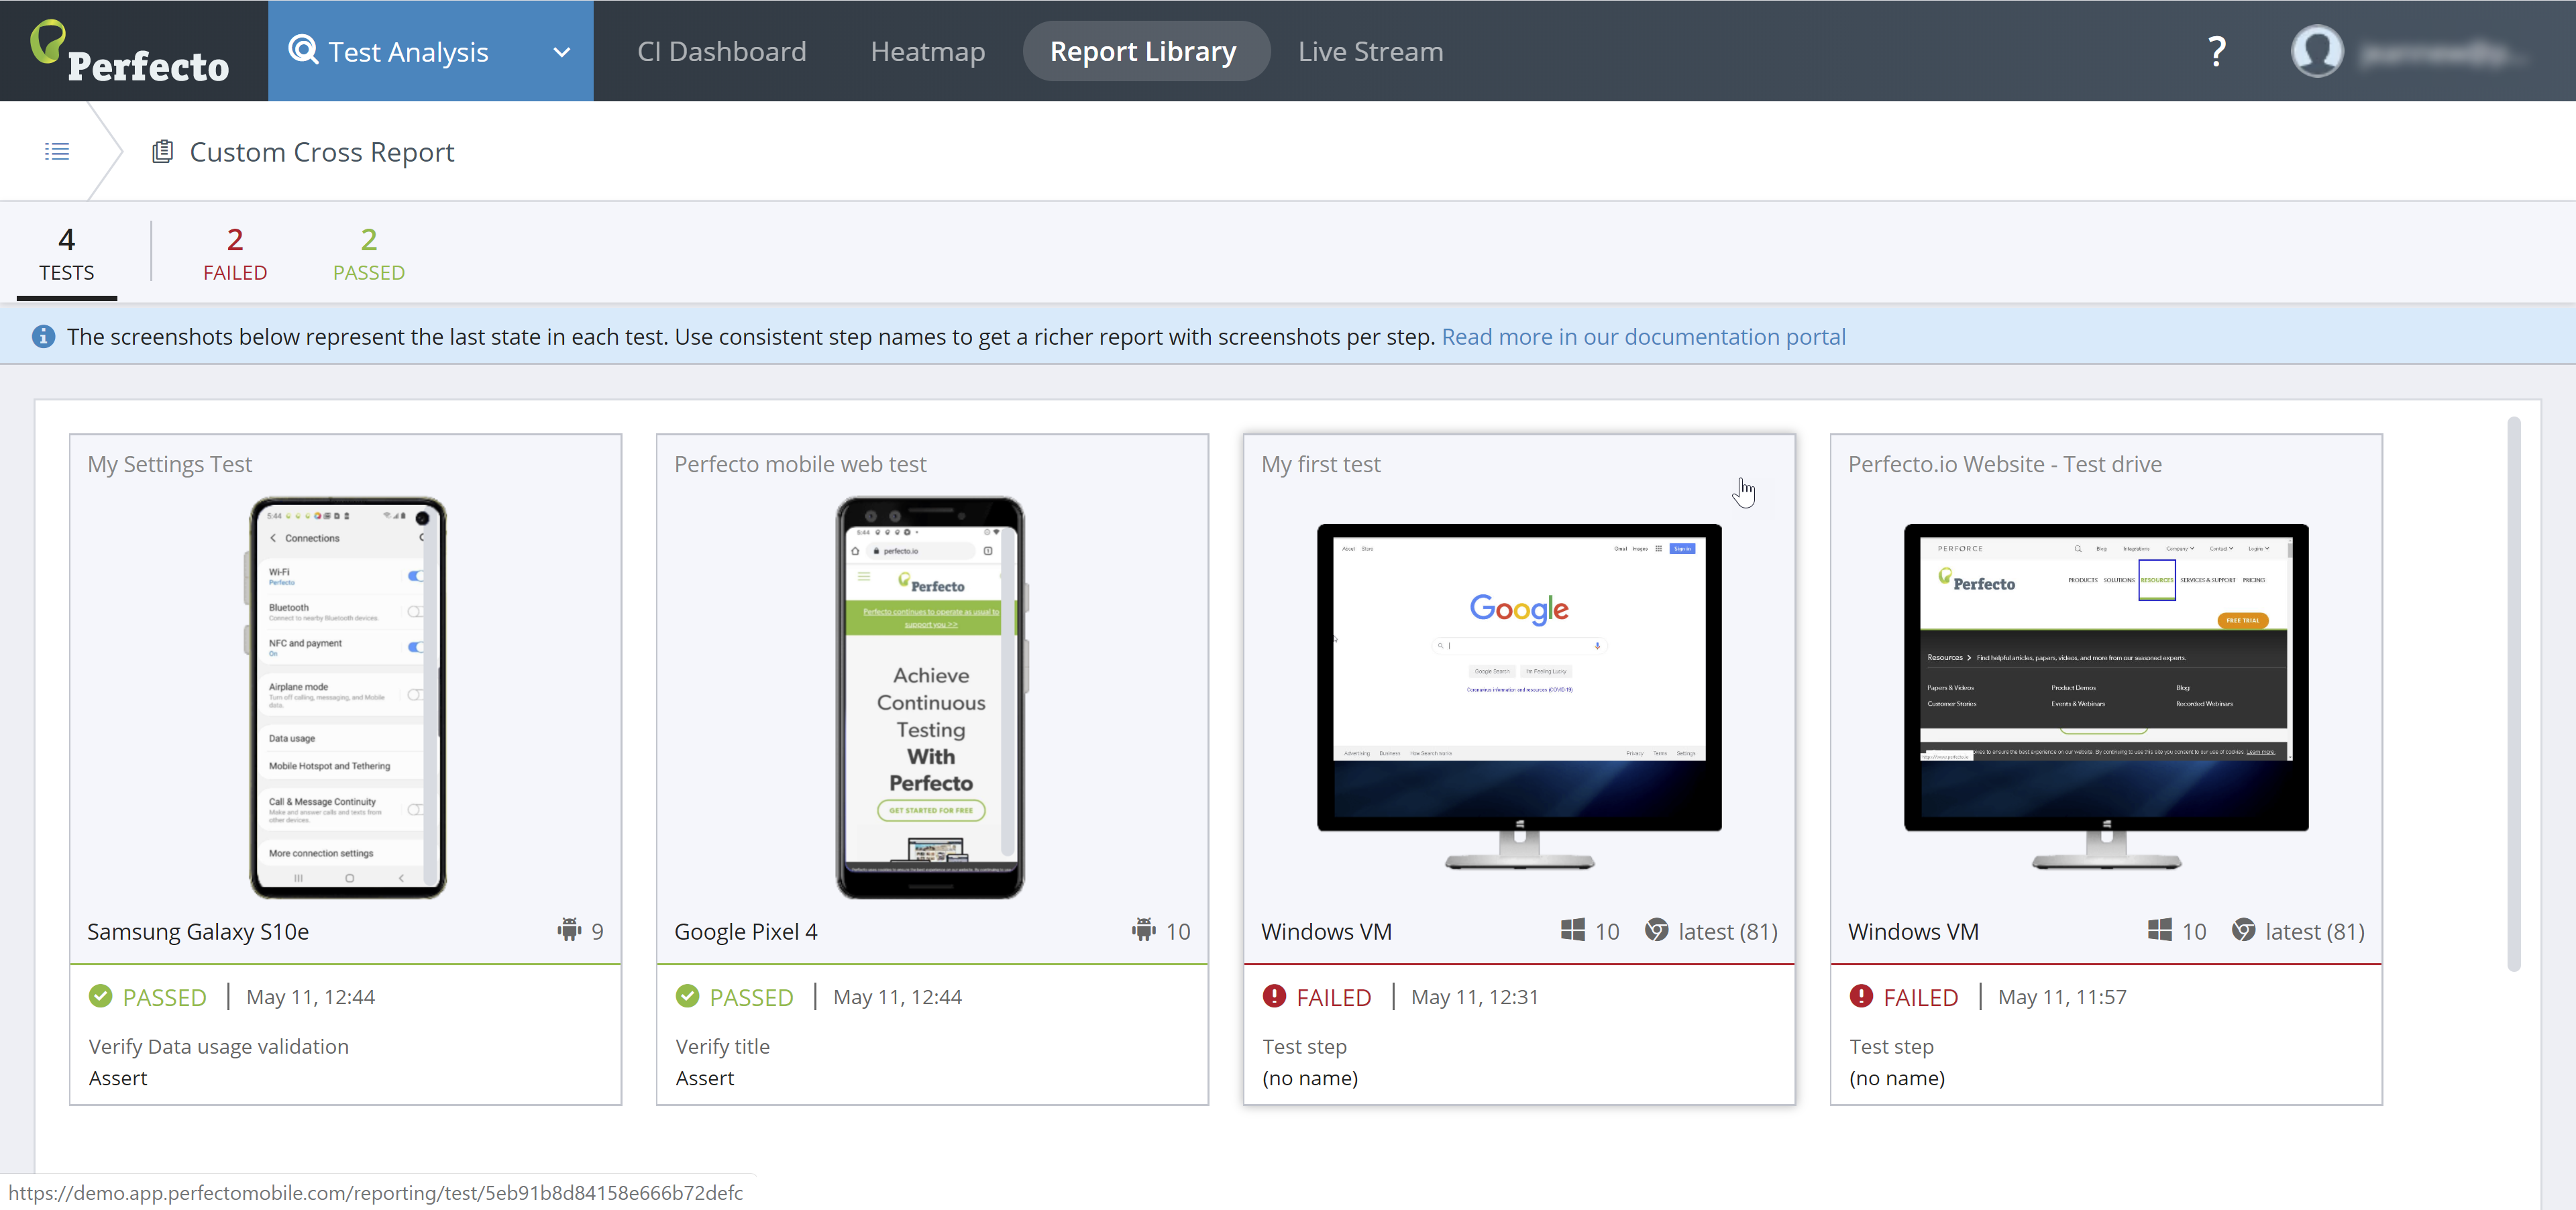
When Smart Reporting does not identify common steps (between the selected tests), the custom cross report displays a top header line with a statistical summary of the selected tests and, for each selected test, the final screenshot of the selected test reports, in a preview frame per test. The tests are displayed side by side for easy comparison of test conditions and results.
For tests in Passed state, the Test Analysis view displays the last command executed (screenshot and step name). For tests in Failed status, it displays the last command (screenshot and step name) that reported failure.
Test-specific cross report
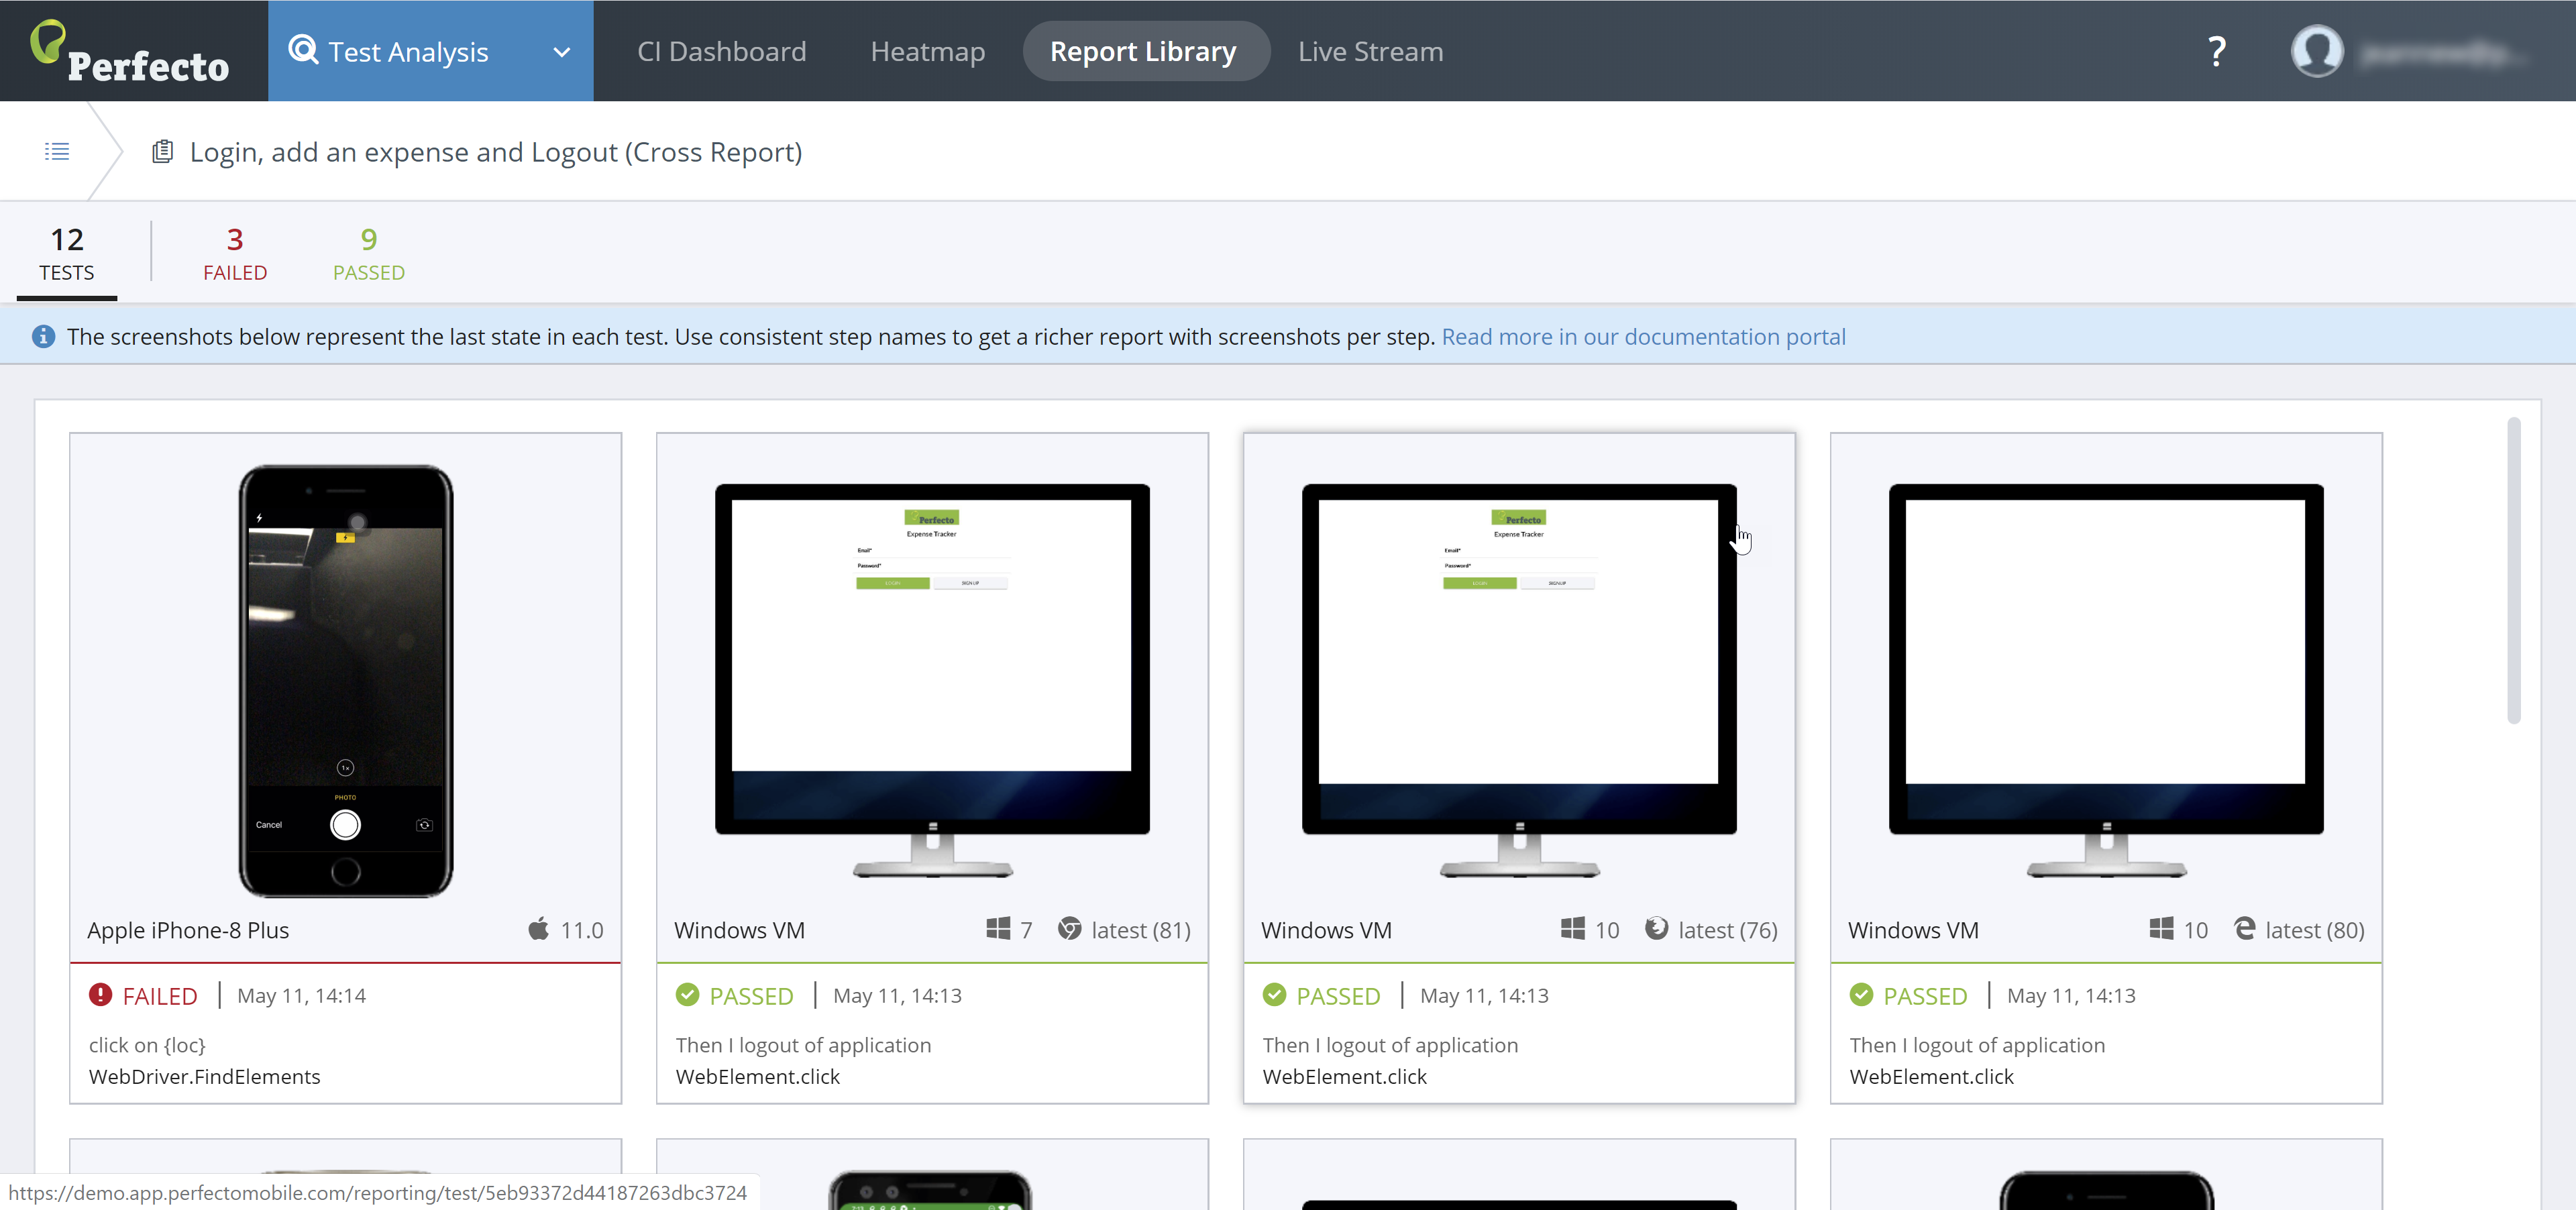
In most cases, a test-specific cross report presents the Common Steps view (see above). In rare cases, when tests with the same name run slightly different scenarios, the test-specific cross report displays without the common steps. In either case, a test-specific cross report includes the same information as the custom cross report, with the following notes (as illustrated in the following figure):
- The window's header includes the test name for the test set.
- The status line and the preview frames are displayed for all tests included in the test set.
Where to go from here
In a cross-report, you can click a preview frame to open the single test report for that specific test run. When you access the single test report from the Custom Cross Report view, the STR includes a return button that links back to the Cross Report view, as shown in the following figure. When Smart Reporting identifies a test set, the return button brings you back to the test-specific cross report.
