Learn how to set up WebdriverIO (WDIO) with Perfecto. For more information about this test automation framework, see the WebdriverIO website.
The content on this page was created using version 9 of the WebdriverIO framework, which was the current and stable version at the time. All examples and setup instructions are based on WebdriverIO v9.
Setting up the integration involves the following steps:
-
Step 1 | Set up a new WebdriverIO project
If you already have a WebdriverIO-based framework, skip this step.
-
Step 2 | Integrate the WebdriverIO project with Perfecto
This will allow you to run tests on real or virtual devices and browsers in Perfecto's cloud infrastructure.
To learn more about supported devices and platforms, see Supported platforms.
-
Step 3 | Integrate WDIO with Perfecto Smart Reporting
To learn more about Perfecto Smart Reporting, see Test analysis with Smart Reporting.
Step 1 | Set up a new WebdriverIO project
If you already have a WebdriverIO-based framework, skip this step.
To set up a new WebdriverIO framework, follow the official WebdriverIO documentation. In particular, refer to the following information:
The following setup steps align with the standard setup steps for the WebdriverIO framework. In steps 5, 6, and 7, you configure information relevant to your Perfecto cloud, such as cloud URL, port number, and server path.
To create a new WDIO framework:
-
Initiate the WebdriverIO setup in a terminal using the official
wdioinit command. -
Follow the prompts in the WebdriverIO CLI to set up the project location, name, and so on.
-
When prompted "Where is your automation backend located?", select the following option:
I have my own Selenium cloud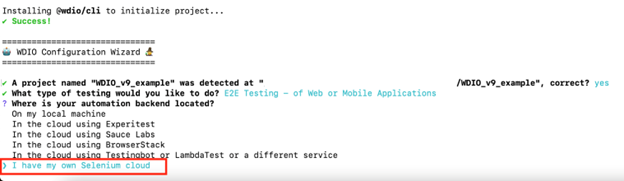
-
Select the appropriate testing environment. For example:
When prompted for the environment you would like to automate, enter:
Mobile - native, hybrid and mobile web apps, on Android or iOSWhen prompted for the mobile environment you would like to automate, enter:
Android - native, hybrid and mobile web apps, tested on emulators and real devicesThe options you select do not affect the option to automate iOS or web mobile.
-
When prompted for the IP or URL of your Selenium standalone or grid server, provide the URL of your Perfecto cloud, as follows:
Copy<PERFECTO_CLOUD_NAME>.perfectomobile.comwhere
<PERFECTO_CLOUD_NAME>is the name of your Perfecto cloud. For example, if your cloud name is 'demo,' the URL is:demo.perfectomobile.com. -
When prompted for the port number, enter the port as
80. -
When prompted for the path to the browser driver or grid server, provide the server path as follows:
Copy/nexperience/perfectomobile/wd/hub/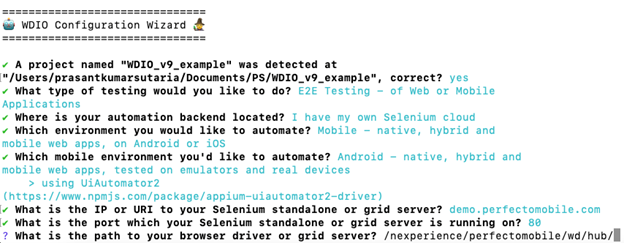
-
Complete the remaining setup steps.
-
After a successful installation, when prompted whether you want to install Appium server, exit the setup without Appium server installation. Tests executed on Perfecto's mobile devices or browsers do not require a local installation of Appium server.
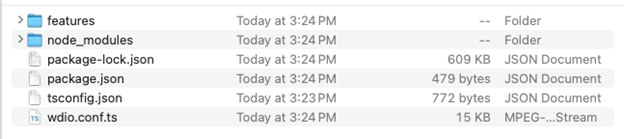
The WebdriverIO project folder should now have the following structure (depending on the answers you provided during the CLI setup).
Step 2 | Integrate the WebdriverIO project with Perfecto
Setting up the WebdriverIO framework with Perfecto involves configuring the hostname, port, and path properties and adding Perfecto-specific capabilities.
To integrate the framework with Perfecto:
-
Open the
wdio.conf.tsorwdio.conf.jsfile, either in an IDE of your choice, such as Visual Studio Code, or in a text editor. -
In the configuration file, do the following:
-
Locate the following parameters and, if the values are not set, configure them as follows:
-
hostname = <PERFECTO_CLOUD_NAME>.perfectomobile.comwhere
<PERFECTO_CLOUD_NAME>is the name of your Perfecto cloud. For example, if your cloud name is 'demo,' the URL is:demo.perfectomobile.com. -
port = 80 -
path = /nexperience/perfectomobile/wd/hub
-
-
Locate and remove the
runnerparameter. When executing tests in the Perfecto cloud, you do not use this parameter.
-
-
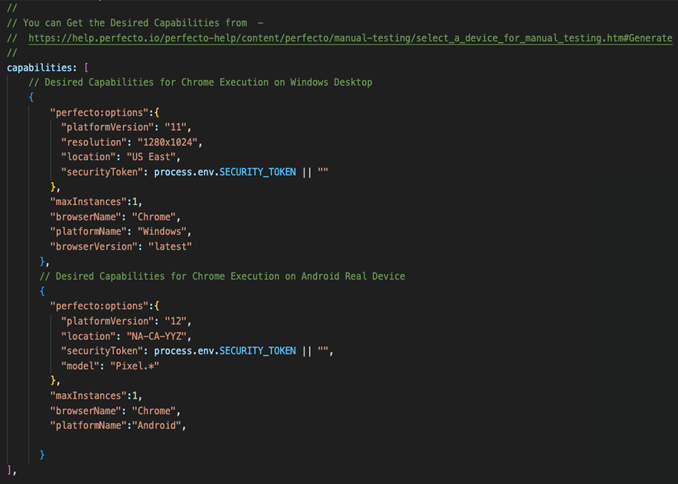
To execute tests in your Perfecto cloud, set the relevant desired capabilities using
perfecto:options.To learn more about the available capabilities and how to set them, see the following resources:
-
Reference for capabilities in Perfecto for automation testing
-
Generate capabilities during manual testing
-
Add the
securityTokendesired capability to theperfecto:optionsobject.If you don't have your Perfecto security token at hand, see Generate a security token.
As a best practice, consider storing the security token in an environment variable instead of directly including it in the WebdriverIO configuration file.
The following screenshot shows an example of desired capabilities for executing tests on the latest Chrome Windows desktop and a real mobile device.
Step 3 | Integrate WDIO with Perfecto Smart Reporting
For non-Cucumber based WebdriverIO framework implementations, follow the steps in the JavaScript instructions.
For Cucumber-based WebdriverIO framework implementations, Perfecto's Professional Services team maintains a WDIO service called wdio-perfecto.v2-service. This service handles the reporting integration and implements all Perfecto extension functions. Perform the following task to integrate the WDIO Perfecto v2 Service with an existing or new WDIO project.
To integrate the WDIO Perfecto v2 Service with an existing or new WDIO project (Cucumber only):
-
In the
package.jsonfile, add theWebdriverIO Perfecto v2 service. Check the version history of thewdio-perfecto.v2-servicefor the latest version of this file. -
In the WDIO config file, add the WebdriverIO Perfecto v2 service in the services parameter, including the parameters required for Perfecto Smart Reporting.
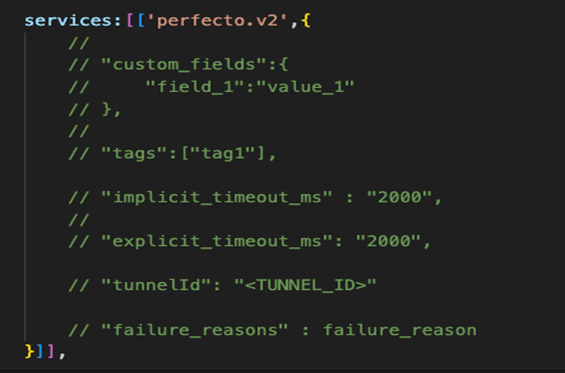
The WebdriverIO Perfecto v2 service accepts parameters related to Perfecto Smart Reporting and additional configurations. For example, implementing failure reasons ensures tthat your executions are categorized under primary and secondary failure reasons, providing better insights into the cause of a failure. To learn more about failure reasons, see Work with failure reasons.
failure_reasonsis a JSON object. To learn more, check the sample project in GitHub.The following screenshot shows a sample implementation.
-
To set reporting-related metadata, configure the following environment variables:
-
JOB_NAME: The name of CI Dashboard job
-
JOB_NUMBER: The number of CI Dashboard job
-
PROJECT_NAME: The name of the project used in Perfecto Smart Reporting
-
PROJECT_VERSION: The version of the project
-
BRANCH_NAME: The name of the branch
-